Contents
Abstract
This guide tells you what it is really like, in practical terms, to use Teams telephony on an individual user and on a corporate level, from the basics including how to make, receive and transfer calls or add in participants, to explaining some of the more advanced functionality such as auto-attendants and call sequencing.
It explores if (and how) the user experience differs depending on the device being used and looks at some of the different personal and administrative settings available.
Finally, it discusses how steps such as training can help to optimise the overall experience.
Introduction
If you’re considering incorporating enterprise telephony into Microsoft Teams to create one seamless communications solution, you’re doubtless already aware of the benefits it can deliver by bringing chat, calls, meetings and messaging together in one place. But what is Teams telephony actually like to use for businesses and their staff?
In this guide, our aim is to bring Teams telephony to life and make the user experience clearer and more tangible – so that when you’re discussing it with colleagues as part of the decision-making process and ahead of implementation, you and your staff have a better understanding of what to expect.
Alongside an outline of the basics, we provide an insight into some of the more advanced functionality available with Teams telephony, to give organisations as a whole and individual users a flavour of what is possible, and how they can make it work effectively for their needs.
What is Teams telephony and how is it different from Teams calling or Teams meetings?
The ability to make calls is a central plank of Microsoft Teams as a unified communications platform. However, with Teams calling there is no connection to the public phone system, so calls are limited to other Teams users only. All calls are carried over the internet from one Teams user to another, and so there is no dial-tone and no phone number to receive inbound calls.
Teams telephony takes Teams calling to another level by connecting to the public telephone network, enabling calls to be made to any phone, anywhere, regardless of whether the recipient is a Teams user, and allowing calls made to a business number from any phone, anywhere to be routed into Teams.
To access Teams telephony, you either add on bundles of minutes called Calling Plans (for small businesses only) or put “Direct Routing1” in place (the enterprise-grade option, managed by a service provider) to deliver a fullblown Teams telephony solution. Whether you are using Calling Plans or Direct Routing, the user experience of Teams telephony will be the same.
It’s worth noting that Teams telephony is different from Teams meetings (which also allow non-Teams users to participate) because meetings are hosted over the internet rather than over the telephone network, and therefore require an email address rather than a phone number to connect.
Teams telephony provides enormous flexibility around how users make and receive work calls: the biggest difference being that business phone lines are no longer tied to individuals’ desks. A user’s PC, smartphone or tablet effectively becomes their work phone, so they can make and receive calls wherever they are. This is particularly vital now that so many of us are working from home. It is a dynamic system: users can even transfer calls from one device to another mid-call, and they can make calls using their mobiles even when they have no signal, using the Teams app over wi-fi.
Teams telephony also delivers a high degree of control around personal and corporate settings to determine what functionality users can have and how the system should be configured, for example, to establish what should happen if a user cannot answer a call. More detail around this is provided in this guide.
What key user features and functionality does Teams telephony offer – and how does this differ from “traditional” telephony systems?
The basics of making and receiving calls
To use Teams telephony, users will need to be logged into the Teams app on their device. Most Teams users will log in automatically when they sign into their PC, and the Teams app will run in the background on their mobile phone. Calls should be made through the app, not through a mobile phone’s main keypad.
All Teams users will have a “Call” tab which is used to make and receive calls, and also to change settings. If they don’t have Teams telephony, the functionality will be limited to Teams calling to other Teams users. If they do have Teams telephony, they will additionally see other contacts listed in their phone/PC and a dial pad so that they can punch in any telephone number as you would with a traditional phone call.
Making and ending calls
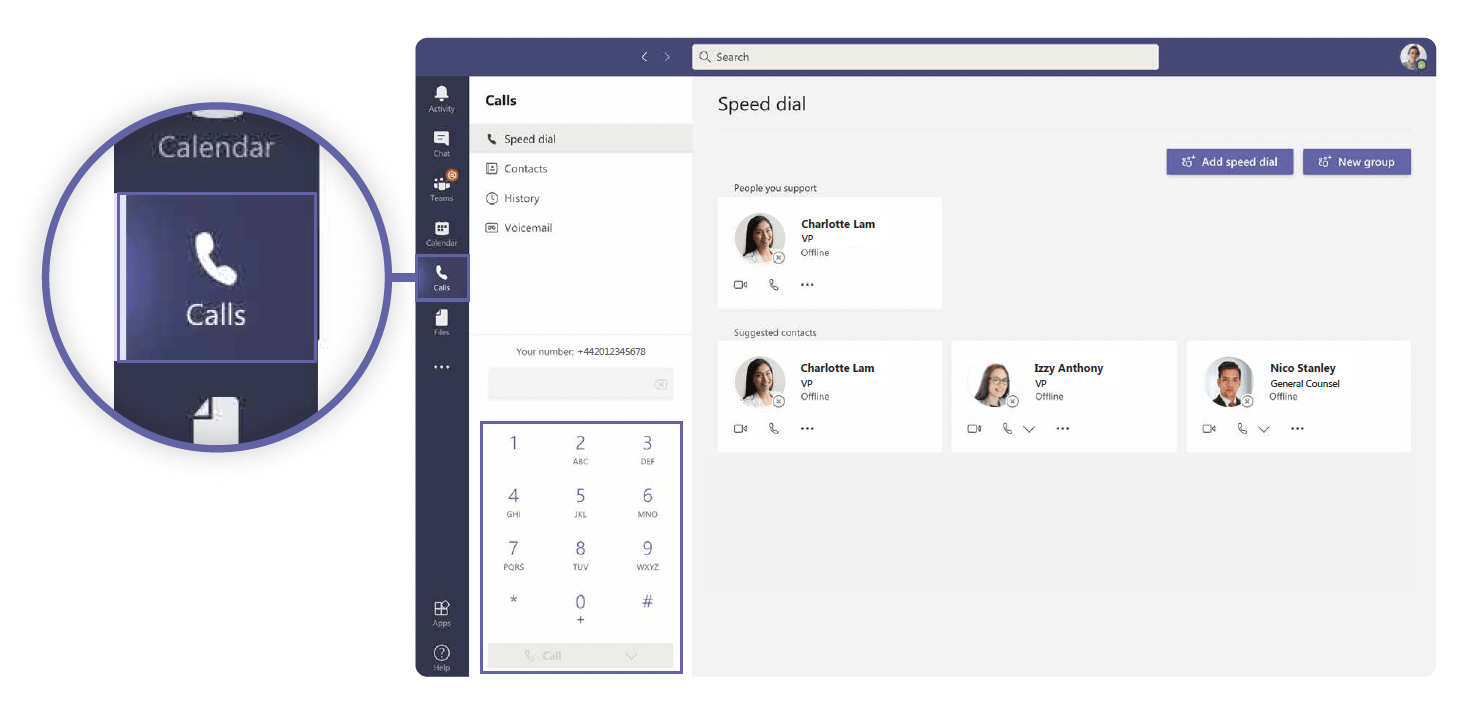
To make a call using Teams, select “Calls” from the blue bar menu on the left-hand side of the screen (displayed alongside “Activity”, “Chat”, “Teams” and “Calendar” (see Figure A). This will bring up a list of options including “Speed dial” numbers, “Contacts”, “History” and “Voicemail”.
To make it even easier to select who to call, the central section of the Teams interface will display icons of your most common or recent contacts.
Once you have selected the name or number you want to call, press the “Make a call” button at the bottom left of the screen. When the call rings, Teams displays phone numbers in international number format.
Once the call has been connected to the recipient, their name or number will appear in the bottom left-hand corner of the screen. Teams will then automatically show anyone who wants to call you that you are already on a call. However, you can still get incoming call notifications if someone else tries to ring you, unless your settings have been configured to send calls in this scenario straight to voicemail instead of ringing.
Figure A
As with a Teams meeting, once a call has been connected, several buttons appear along the top, including the “Mute” button to enable you to mute yourself, and “Leave” (in red) for when you want to hang up the call.
Figure B
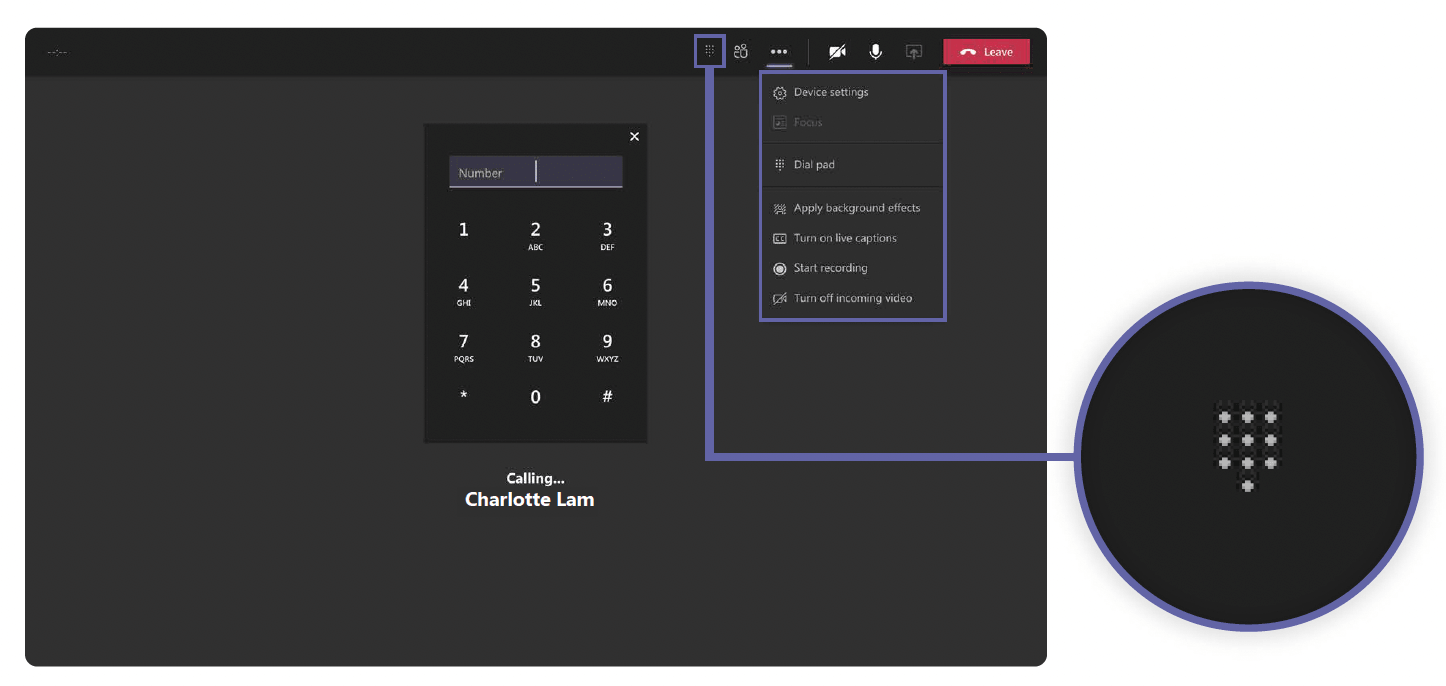
There is also a dial pad (see Figure B) icon on this top tool bar, to show that the dial pad remains available to you in case you need to use it mid-call, for instance to select automated call options during the call, such as pressing “1” for the switchboard or “3” for a helpdesk.
In addition, on this top tool bar you will see an icon indicating two people, which, if clicked, will display the call participants.
Finally, there is also an icon with three dots, containing a drop-down menu of other options when you click on it, including the ability to put a call on hold or transfer it.
Receiving calls
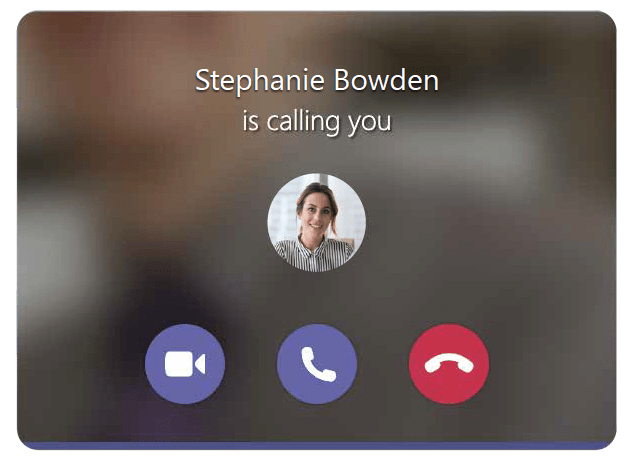
When a call comes in through Teams, a notification will pop up in the bottom right-hand corner of your screen with the caller’s number (and/or name and photo if they are known to you in Teams) with a discreet ringing tone. This is known in Microsoft’s official documents and training materials as a “toast” because it pops up like toast from a toaster.
To answer, click the green “accept” button or if you decide not to answer, press the red “decline” button to hang up (see Figure C). If you decline (or fail to pick up) the call, Teams will do whatever you have requested it to do next in “Settings” – for example, you can set it to go to voicemail or re-route it on to one of your colleagues.
Figure C
Once you have answered, the interface looks exactly the same as it does when you are making a normal Teams call, with all the same windows, buttons and options. Teams will then automatically mark you as “Busy – on a call” for the duration of the call.
Including and displaying call participants
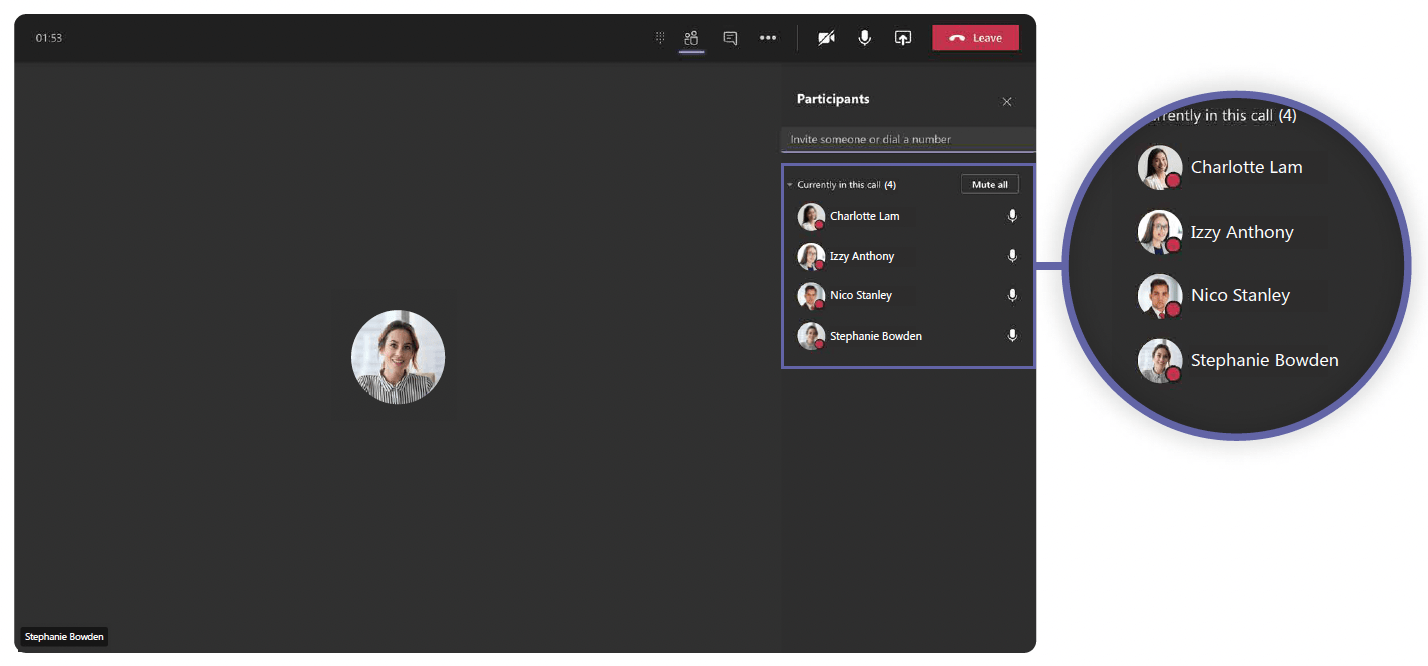
Teams telephony provides you with a list of the people who are participating on the call which, if you click on the “participants” icon, appears down the right-hand side, as it would if you were in a Teams meeting (see Figure D).
During a call, you can invite and add other participants by typing in their name or number and Teams will conference them in to create a multi-party call. The same interface and buttons will be displayed as on a one-toone call, although you can control features like the mute button for different people.
Holding or Transferring calls
To place callers on hold, simply press the three-dot icon to reveal the drop-down menu and click the “Hold”, button. Then press “Resume” when you want to resume it.
To transfer calls to other recipients (or to yourself on another device), Microsoft Teams gives you two options in the drop-down menu (see Figure E):
The “Transfer” button will directly transfer the call (also known as a blind transfer), cutting off the call from the original recipient and putting it straight through to ring through on the line of person the call is being transferred to, without any introduction.
Figure D
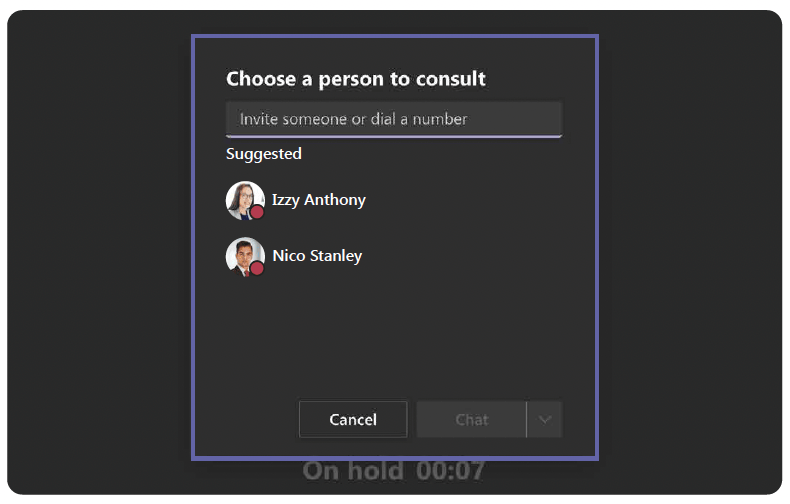
The “Consult then transfer” button beneath it, places the call on hold, while the original recipient contacts the person they want to transfer the call to (either by phone or on chat), to see if they will take it. The original recipient can then press “Transfer” to transfer it, or “Resume” to revert to the caller.
Figure E
The transferee’s name or number (and photo if they have one) will show up in the bottom left of the call window. Helpfully, Teams will show you if the transferee is busy, offline or has posted a “Do not disturb” notification. However, the call (and the request to transfer) can still be put through even if the person is showing up as “busy” – it will only not do so if they have requested “Do not disturb”.
Helpfully, Teams does something called “safe transfer” which means that if the call for any reason can’t connect to the destination, it isn’t lost but rings back to the original recipient.
Adjusting device settings
In the three-dot drop-down menu, you also have the option to change “Device Settings” (for if you are swapping between connected devices, such as changing headphones, or if you want to adjust the volume).
The user experience from a smartphone
To make a call in Teams on a smartphone, you need to do so via the Teams app, rather than your phone’s dialpad.
For obvious reasons, as with many apps due to smaller screen size, the mobile interface does look different to the PC interface. However, all the same features and functionality are available, and settings are integrated across all a user’s devices, so it can be used in the same way.
The “Activity”, “Chat”, “Teams” and “Calendar” icons appear along the bottom of the screen, but you will need to click on “More” to bring up the “Calls” icon.
Clicking on “Calls” will bring up your call “History” which shows the same information you would see on your PC or laptop.
At the top right-hand corner is an icon which allows you to make a call, choosing recipient by name or number. To get a dial pad, tap the phone+ symbol.
The user experience from a desk phone
Again, as with smartphones, all the same options and functionality are available on a desk phone as on a PC, call history is integrated and user settings are the same, but the layout is slightly different.
Teams desk phones run a version of the Android software, which is optimised for use with a handset with hardware buttons, and the interface on the relatively small display screen is similar to that of an android smartphone, with major icons along the bottom and “Calls” under the “More” tab.
Dialling can be done on the dialpad on the phone and once connected, icons for mute, volume and three dots for more options including call “Transfer” will appear on the phone display.
A joined-up user experience
Whether you are calling on a PC, smartphone or desk phone, the user experience is designed to be the same with identical buttons at your fingertips, and you will not need to learn to navigate your way around a different user interface for each.
Minor adjustments for screen size and use case are all that is necessary (i.e. phones are more geared up to show the dial pad), plus, as mentioned previously you can switch seamlessly between different devices mid-call if you wish.
Advanced user features
Whereas the previous section focussed principally on standard behaviour for people using Teams telephony, this next section looks at how more advanced functionality can be set up in advance to meet specific user requirements and help support entire business workflows.
Settings for voicemail, to set call groups or to delegate calls can be configured on an individual level, either by the user concerned or by an administrator. On an enterprise-wide level, businesses can control what settings are or are not available to individual users in the organisation at large or to certain user groups.
There are also situations where an enterprise-wide (rather than individual-level) approach to system configuration will need to be taken to create consistency and efficiency – notably “autoattendants” and “call queues”.
Personal call features – for individual users
Voicemail
In Teams, as well as receiving voicemails, users can also receive notifications of a voicemail with a transcript of the message, which will appear both in Teams and in their email. Though the transcript may not provide an exact replica of the message (sometimes some of the meaning gets lost), it can provide a helpful indication of what the message contains, so that you can decide whether or not to listen to the message.
Figure F
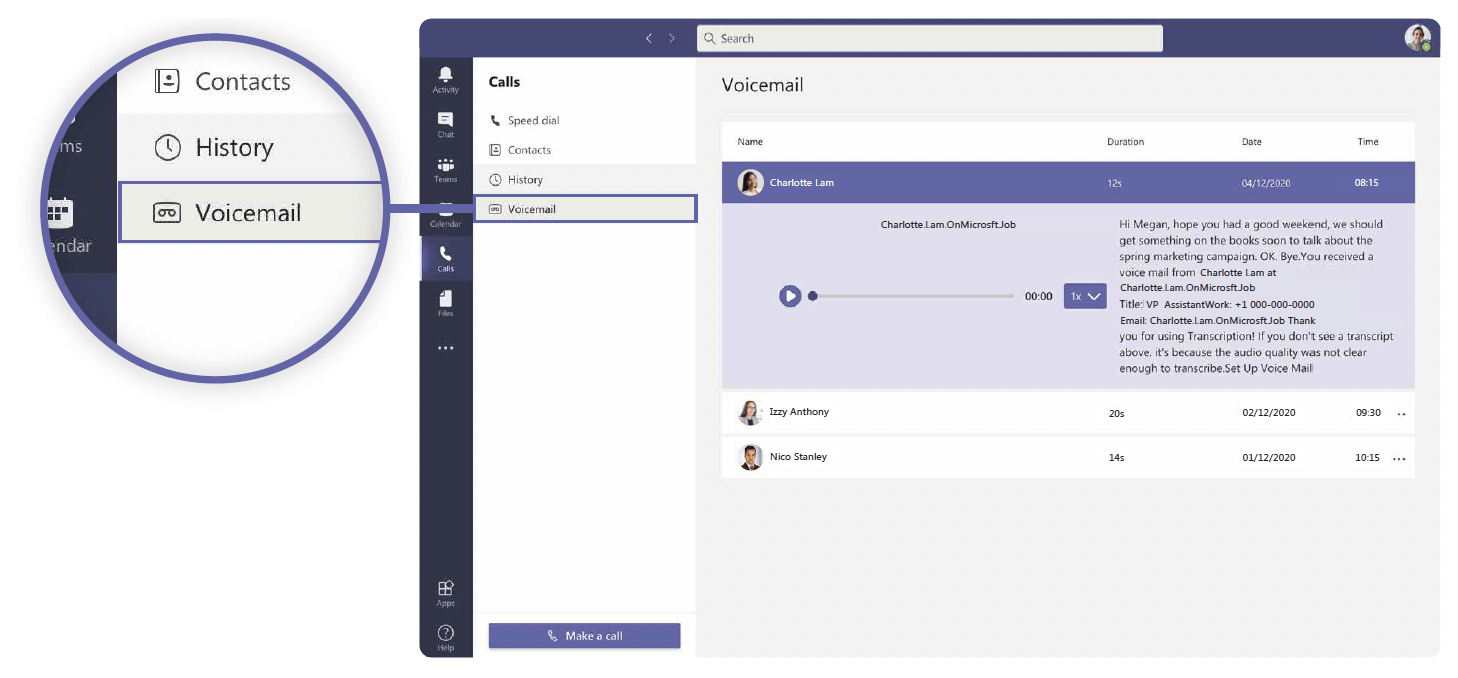
Voicemails appear in a list (see Figure F), so it is easy to play messages back, return calls, delete the message, add the caller to your contacts or speed dial or block them with one click in the drop-down menu. Voicemails can be played back at rapid speed if required, and you can jump forward or back to specific points in a message so you don’t have to listen to it all.
Users can choose how calls are handled when they go to voicemail, for example they can use the default voicemail message, or play their own pre-recorded custom greeting. They can choose what language the message is played in and select when it is played – for instance only out of hours, based on your calendar status.
Users can also choose their own call answer rules: so for instance, they can decide whether callers can leave a message, simply play the greeting and end the call or transfer the call to someone else.
Call parking
Call parking is where a call is answered and then put on hold for a recipient to pick up using a unique code within a pre-defined number range, rather than transferring it to a specific person or number. For example, a receptionist could put through a call to a worker in a warehouse or a specific office department without needing a direct number, announcing the code over a tannoy or via chat so that they can retrieve it. This can also be a useful feature to use when you want to transfer a call from one device to another.
The number range for parking call codes will need to be set up in advance by an administrator. “Park call” should then appear as an option in the three-dot drop down menu. To retrieve a parked call, click “Unpark” and enter the code you have been given.
Group call pick-up
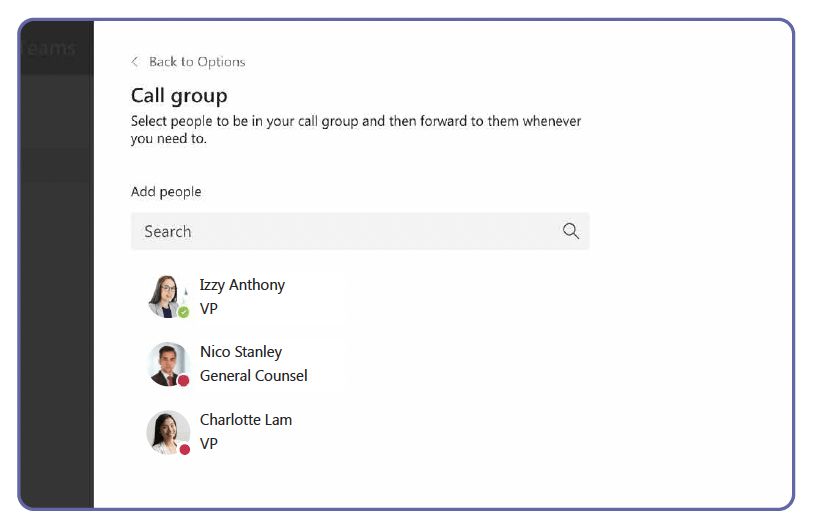
Individuals can choose to have their calls redirected to colleagues if they can’t answer them. In “Settings”, select “Ring my call group” to add people into your call group (see Figure G). It is possible to prioritise who should be called first. Each person can have up to 25 co-workers assigned to their call group.
When this happens, Teams will tell you that a call that is ringing on your phone was originally made to another person (and tell you who that person is), with a blue bar across the top of the call alert (or “toast”) to differentiate it from a normal call.
You can configure different ringtones for different call categories, i.e. for direct or rerouted calls, within “Settings”.
Figure G
Delegating calls
Teams telephony supports businesses and individuals delegating calls to others – for example it allows a Personal Assistant to make and take calls on behalf of their boss.
When you go to place a call, you can choose whether to place it as yourself or as the person who has delegated a call to you to place. Equally, you can choose to take an incoming call as yourself or the other person.
Unlike with Skype for Business, delegating in Teams will not impact Exchange – so you can delegate your Teams calling without also, by default, delegating access to and control of your email and calendar too.
Corporate call features – for organisations at large
Auto-attendants
When calls come in to general company numbers (rather than to individuals personally), you can configure what should happen to those calls, for example out of hours or when multiple calls are coming through at once during the working day.
For example, you can decide who should answer it: someone in the organisation, a voice app (such as a preconfigured call queue), or an external number.
Then you can decide on the call flow: whether to play a greeting or hold music, and then how to route the call, by disconnecting it, redirecting it or playing a menu of options (such as “Press 1 for sales, Press 2 for support”). Voice recordings can be added to these menus if required. You can even specify timezones and languages to apply.
Call queues
Often, the auto-attendant will roll calls through to “Call queues”, where multiple people can take calls, for example a hotline or a customer service or support desk. Here, the configuration process is similar to that of auto attendants, with options to set greetings, languages and time zones or play hold music.
When it comes to establishing call answering protocols, you will need to decide who are the users or groups that should deal with each queue and build up a list of people who are eligible to answer calls, such as customer service agents.
A selection of call answering methods is available to determine how calls ring through:
- Attendant routing – where everyone available on the list will be rung at once
- Serial routing – which will go through the list, ringing individuals one at a time if no-one answers, in a fixed order (i.e. it always rings user A first, then user B)
- Round robin – similar to serial routing, but the next call will ring through to user B first, and the third call to user C, and so on
- Longest idle – the call will ring through to whoever on the list has had the longest interval since their last call
You can set how long to ring a user for before Teams tries the next person on the list. Teams also pays attention to user status, avoiding those who are showing up as “busy”.
You can select whether users have a choice over whether they take calls or not, for example when they are on lunch. There are also choices about call overflow – namely how many calls can sit in a queue at once (the maximum is 200), and what happens when the call limit is reached (does the call disconnect or is it rerouted) Call handing time-outs can be set to determine how long calls can stay waiting in the queue (maximum 45 minutes) before they are disconnected, rerouted.
Maximising the benefits
In this way, you can create whatever set-up best suits your needs, from team group calling to contact centre-style call cascading – and it is all included within Teams as standard.
Although it’s fairly straightforward to use, it’s definitely worth training individual users on how it works and how to use it on a day-to-day basis. After all, if they don’t know that specific functionality is available or they are afraid to have a go at configuring it to their needs, they may not use it in the optimal way.
When it comes to organisation-wide configuration, while it may be possible to do it yourself, you may want to leave it to the experts – who will be on hand anyway if you are using a managed service provider to deliver Teams telephony services, which most businesses will. For example, setting up multiple different call queues for different scenarios, which may interconnect, can create unexpected pitfalls, with the result that systems may not behave in the way you wanted or fail to work effectively and efficiently. These are issues which we here at LoopUp can help to map out and assist in implementing as part of the service.
Finally, the user experience can be optimised by deploying the right devices and hardware, and by taking steps to optimise the corporate network – both of which topics are covered in other LoopUp guides.
Summary
Teams telephony represents a paradigm shift in the way calls are made and received, but that does not mean it is complicated to use or understand. The user experience is a step forward from that of traditional phone systems, but one that users should be able to easily get used to and come to find intuitive and easy to navigate, while offering corporate flexibility and control.
Behind the scenes, it offers some sophisticated settings which will need to be configured correctly. This may require some expert guidance either to help you set it up, or to manage the process on your behalf.
This guide should give you a clearer idea of what Teams telephony can do and how organisations and users can get the most out of it but there’s no substitute for trying it yourself and you can do that by having a supplier give you a demonstration. If you want to know more speak to one of our experts.